Tuesday, December 27, 2011

Last Post

Since August I have worked to fully emerse myself in the world of cycling. In this time, I have learned so much. Some I had time to document on this blog; other lessons never made it to the Interwebs, but I will never forget.

I have realized that both cycling and blogging are two elements in my life I want to hold on to. So, in this spirit, I have decided to close down this blog so that I will have more time to focus on my other blog mgregueiro.com

There I have been blogging about my 30 Day Challenges, random thoughts, politics, pop culture, and yes cycling. 

So if you have enjoyed this blog, check our mgregueiro

Sunday, December 4, 2011

Tip 4: Don't ride on the sidewalk

Now, I will openly say that this is a rather controversial tip. Best case scenario, you live in a bike friendly part of the city, and your tax dollars have gone towards painting and maintaining bike lanes. Worst case scenario, you are given two choices: sidewalk or street. In that case, I almost always choose the street.

Although Florida, among other states, allows cyclists to ride on the sidewalk, there are very few circumstances where this is the best decision (for Florida state bike laws, click 
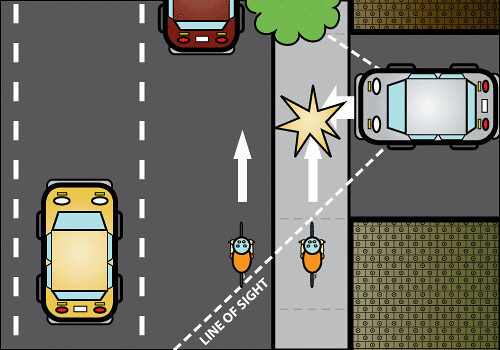
here). The sidewalk is not designed for moving vehicles. It is not regularly maintained in the same way that streets are. And it is filled with many physical obstacles for a cyclist: street signs, bus benches, random poles, and pedestrians. Plus, as you can see in the image I have shared, a motorist turning into traffic isn't looking for quickly approaching cyclists on the sidewalk (if they are looking to the sidewalk at all).

If there is no bike lane, there are two alternatives that are better than the sidewalk: take an entire lane (legally justified) or take half of the lane. My first few months on a bike, I took the entire right lane. Although I definitely felt safe, I was constantly heckled by passing motorist. After many trips attempting to ignore the ignorance of inconsiderate motorists, I decided to only take half of the lane.

Taking half of the lane has significantly lowered the number of altercations with motorists, but it has its own drawbacks. When I am only taking half of the lane, many motorist attempt to zoom by me without changing lanes; this has caused many close calls. If that isn't enough, poorly kept roads are usually worst along their edges. This is where I have come across the worst erosion and also where all the  glass and medal from accidents is brushed to...

At the end of the day, it is all about being aware. No general strategy works in every case. It is really important that all factors be taken into consideration to ensure that you safely get from point A to B.

So read up on your State laws, stay alert, and enjoy your ride : )


Sunday, November 27, 2011

Tip Three For Safely Cycling Crazy City Streets

So here is a huge pet peeve of mine. I'm safely enjoying my ride on a busy Miami street, when all of a sudden I see a cyclist coming right at me... jack ass. Since I ride on the road, this leaves me with two options: hug the sidewalk and force the other cyclist into the street or move myself into the street and allow the other cyclist to stay clear of traffic.... Don't be that person.

Riding with traffic is not only safer for other cyclists, but also makes you more visible to motorists, especially those pulling our of drive ways. When a motorist turns into traffic, their attention is directed towards oncoming traffic. Though they may give a quick glance in the other direction, to spot any nearby pedestrians, their glimpse is not going to be long enough to spot a cyclist traveling at ten plus miles per hour. If, however, this same cyclist is moving ten plus miles with traffic, they will be easily be spotted by an attentive motorist pulling out of a driveway : )

Monday, November 21, 2011

Tip Two For Safely Cycling Crazy City Streets: Make yourself visible

Once I purchased my helmet, the next step was to increase my visibility on the road: a driver is less likely to hit me if they can see  me : ) This is the head light and tail light I purchased from a local bike shop. I have used both of the lights for a few months now and I love them. Rain or shine they have given me no problems. Whatever light you decide to purchase, be sure they are placed somewhere that is  visible to motorist. Also, be sure to keep them on the "blink setting," this will make you significantly more visible to motorists.

On this same note, it is important to increase visibility for day time commutes. Lights are great at night, but in the day increased visibility means bright clothing. Whenever possible, wearing bright colors, or reflective materials, will make you more visible on the road.

Sunday, November 20, 2011

Week Three: Tips For Safely Cycling Crazy City Streets

As I complete my third week cycling to work, what better topic to discuss than bike safety. A recent survey by Travel+Leisure ranked Miami's driver as the worst in the nation. In these three weeks cycling I have definitely come in contact with many of the drivers that put Miami at the top of this list. Although the road can be a dangerous place, there are five steps every cyclist can take to make their ride much safer. For the next few days I will post a new tip for safely cycling crazy city streets. Here is tip one : )


Tip One - Wear a helmet!
Though rather obvious, I see very few cyclist wearing helmets on my commute to work. Clearly their childhood was not bombarded with video footage of watermelons crashing into city streets. I once heard it said, The most important part of a bike is its engine. A cyclists bones and muscles can heal, but a severe accident without a helmet is a death sentence. Cycling is truly one of the most liberating hobbies I have adopted and I hope to continue my cycling adventures for a long time to come. Many cyclist have been in accidents and come back from it. Wearing a helmet significantly increases the chances that I will not only survive a serious accident, but be able to ride another day.

Monday, November 14, 2011

Week Two: Cycling to Work

My single-speed enjoying the beautiful Biscayne Bay

After two visits to the chiropractor, and a long discussion with a physical therapist on the impotence of hydration and stretching, I took on week two cycling to work : )  

So it turns out, jumping from twenty miles a week to one hundred miles was not a good idea. My muscles were not only over worked, but under stretched and under hydrated. Lesson? Drink tons of water, stretch before and after each ride, and add miles to your week carefully. 

Livestrong.com has a super specific breakdown of how to measure your body's water needs. Personally, I started with a commitment to drink at least one cycling bottle of water a day. If after my workout, my urine wasn't clear, then the next time I would drink more water. Simple. Currently, I am cycling about 14 miles/day and averaging 2-3 cycling bottles of water. 

Similarly, stretching is also super important. Two weeks ago, I over worked my back because I only stretched my legs. Now, I know that cycling works out the entire body, especially the back. Here are a few full body cycling stretches, with images and descriptions, from About.com. Since learning about the importance of these stretches, I have made sure to stretch lightly after warming up, then fully at the end of each trip: once when I get to work and then again when I get home.

The last major change to week two, was the number if miles I committed to. Although one hundred miles a week is a short distance for a veteran rider, I am a novice: one hundred miles a week is something I need to build up to. So this last week, I committed to cycle to work every other day and gave myself extra time for each trip. Not only did it allow me to stop and take in the beauty of my ride, but even to snap a few pictures in the proces : )

At the end of week two cycling to work, I am happy to say that I feel much healthier. Properly hydrating, stretching, and pushing my body has left me feeling stronger and more confident as a cyclist. It is interesting to see my body develop along side my mind as I push myself as a cyclist.

Safe riding. 

Friday, November 11, 2011

Picking the right bicycle helmet

In my first post on bike accessories, I discussed the importance of purchasing a helmet. Here I want to focus on how I selecting a helmet that fits my needs. With prices varying from $10-$300, and a variety of brands to choose from, this decision can quickly become overwhelming. But as I learned, when it comes ti gear, the first question is What do I need? 

No matter what any bilboard of magazine advertisement claims, all brands average the same in crash tests. No study has shown a relationship between a helmet's cost and its safety rating. In fact, the only thing you want to make sure is on your helmet, is the U.S. Consumer Product Safety Commission (CPSC) sticker. This proves the helmet has been tested, and meets all safety standards. Besides that, it is all about needs and looks : ) 

For me, I was looking for a simple helmet, that would provide ventilation as I commute to work, without breaking the bank. In the end, I went with a $30 entry level Giro. I have had this helmet for about three months now and couldn't be happier. In retrospect, the only thing I would change is my helmet's color. I haven't researched this, but I imagine that a lighter color would not only increase my visibility on the road, but absorb less of the suns heat. Just a theory. 


To finally decide on which helmet was right for me, I watched dozens of YouTube videos and read even more articles. The video below really helped give me a general idea of the types of bike helmets on the market and how to correctly fit one to my size. After watching it, I went into a few local bike shops to be sized and feel the difference between the various brands and price tags. Though I love my helmet, that does not mean it is the best helmet for your individual needs. I hope my experience and the video below will help you find what is right for you : )